|
INSTALLATION AND OPERATING INSTRUCTIONS FOR THE
AUTOMATIC SOLAR VENT OPENER
1. Your automatic vent control is not suitable for use where
temperatures will exceed 50°C/122°F.
2. Ensure that your greenhouse window or cold frame light is able to
open and is not obstructed otherwise damage could occur.
Technical data:
A. Maximum window opening approximately 45 cm/18".
B. Maximum opening at 30°C/86°F depending on adjustment and load.
C. Suitable for greenhouse vents or cold frame lights weighing up to
7 kg/15 lb.
D. Approximate arm length is 11 inches.
Components:
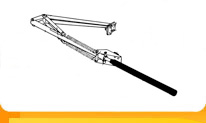
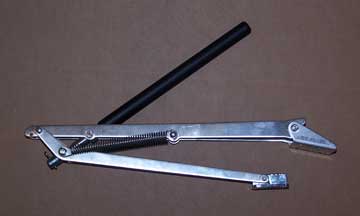
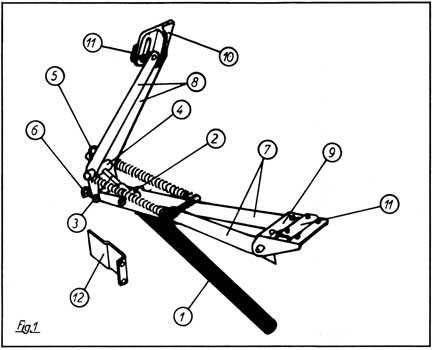
See fig. 1.
1. Cylinder 2
2. Cylinder housing
3. Piston rod
4. Clutch T
5. Hair pin
6. Stop pin
7. Arm B
8. Arm A
9. Frame bracket
10. Window bracket
11. Clamps
12. Mounting bracket
Maintenance:
Lubricate all movable parts with a light oil after fitting, each
spring and as required during the summer. Apply petroleum jelly or
grease to the cylinder thread occasionally.
Guarantee:
A correctly fitted and used UNIVENT is guaranteed for 1 year
provided that it has been fitted and maintained in accordance with
the instructions.
Winter-storage:
It is recommended that your Univent - or at least the cylinder -
is removed from your greenhouse or cold frame for the winter. Store
it in a dry place and do not forget to lubricate
particularly the piston rod before remounting in the spring. Check
that the piston rod moves smoothly.
Fitting instructions:
1. Check that your greenhouse window or cold frame light opens
freely and is not obstructed.
Greenhouses: Windows in roof and sides:
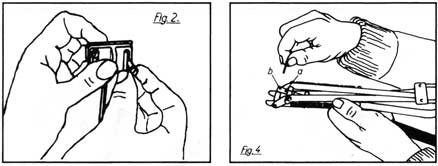
2. Loosely fit a clamp (11) to the window bracket (10) using two of
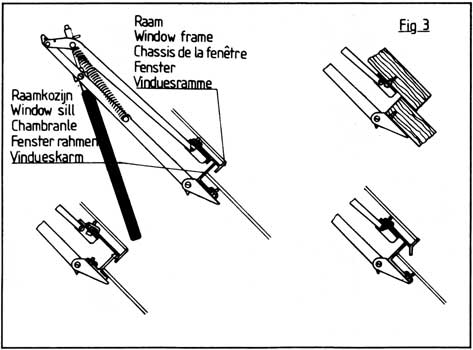
the screws supplied. See fig. 2. On wooden greenhouses the brackets
can be screwed directly on to the woodwork. See fig.3.
3. Choose the most suitable pair of holes and loosely fit the other
best clamp to the frame bracket (9). Ensure that the upper edge of
the frame bracket is as close to the edge of the window frame as
possible. See examples in fig. 3.
4. Now measure the distance your window will open.
A. If the window will open at least 42 cm 16/1/2 ":
Push the piston rod (3) through the cylinder housing (2) into
the clutch T (4). The hole in the piston rod should be placed in the
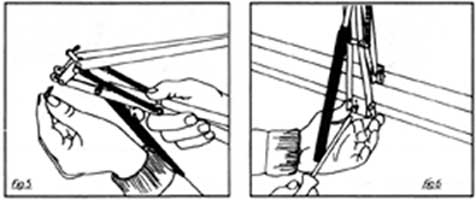
line with hole »a« in the clutch T. The hair pin (5) should then be
fitted through the holes, see fig. 4.
B. If the window will only
open between 30 and 42 cm /12" and 16":
Follow the same procedure as described above except remove the
plastic cap from the clutch T (4) and use hole >>b<< and fit the
stop pin (6) on to the arm (7). See fig. 5.
IMPORTANT:
Do not fit the stop pin
(6) unless the hair pin (5) is placed in hole >>b<<.
5. Fit the frame bracket to the window sill, see fig. 6.
6. Fit the window bracket to the window frame just above the frame
bracket. The window must be in the closed position.
7. Open the window sufficiently to allow you to screw the cylinder
into the cylinder housing. Screw in the cylinder until the thread is
equal length on both sides of the housing and then release the
window
Cold frames:
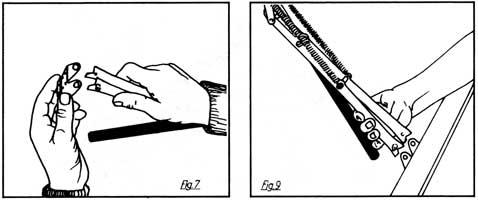
8. Turn the frame bracket (9) 90° as shown in fig. 7.
9. The opener should be fitted in the middle of the front side and
light of the cold frame.
A. Aluminium frame with glass in sides and lights:
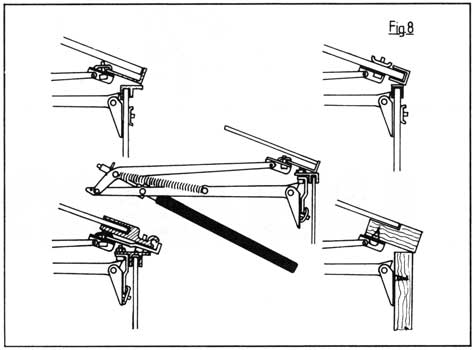
Proceed as described under greenhouses, item 2 and 3. See fig. 8.
If neither the frame bracket nor the window bracket can be fit- to
the aluminum frames, the enclosed mounting bracket (12) should be
fitted. If none of the brackets supplied can be fitted, you should
make your own brackets.
B. Wooden frames and frames with plastic sheets:
On wooden frames the brackets can be screwed directly on to the
woodwork, see fig. 8.
On frames using plastic sheets in sides and lights holes should be
drilled through the sheeting and the clamps are used as nuts for the
screws, see fig. 8.
10. Disconnect the frame bracket (9) from the arms (7) and fit it to
the frame.
11. Fit the window bracket to the frame of the light.
12. Assemble the arms and the frame bracket as shown in fig. 9 and
check that the lid can be opened and fully closed.
13. Now dismount the entire opener and proceed as described under
greenhouses, item 4.
14. Screw the cylinder (1) into the cylinder housing (2) and fit the
entire opener again.
Adjustment:
It is recommended that the UNIVENT is adjusted only when the
temperature in the greenhouse is constant as it will take some time
before it has responded completely to changes in the temperature. If
you want the UNIVENT to start opening the window at a different
temperature adjustment may be done by turning the cylinder:
Clockwise to achieve an earlier/higher opening.
Counter clockwise to achieve a later/lower opening.
One turn corresponds to app. 0,5°/1°F. - Please note that the
temperature in the greenhouse may vary considerably, also at the
individual windows. |